

DIY Woodworking Making Cedar Garden Planter Boxes
- DIYTechnician

- May 21, 2022
- 4 min read
Gardening season is upon us and its time to grow your favorite crops in using this super easy raised garden bed design. I happened upon some scrap cedar from one of the local fencing places and made a couple of these for relatively free. You could get by with just a table saw and some screws if that's all you had and you could wind up with the same product. I like to use a combination of a table saw, chop saw, brad nailer and cordless drill with a few self tapping screws to hold the corners together for the long term. Not shown in this video is that I started using Romex wire staple type fasteners to hold the boards up against the frame. The brad nailer will hold just fine as the force of the dirt, when filled, pushes out against the boards so they won't as easily come loose but the Romex wire staples or some small wood screws or nails will work even better. This simple design is one that most inexperienced folks can use.
The steps are as follows:
1. Cut four 2 X 4's to 30" in length
2. Using a table saw, rip those in half, lengthwise making 8 pieces
3. Cut 45 degree corners on all pieces
4. Using table saw, cut notch (ledge) into each piece
5. Nail corners together making two full picture frame structures identical to each other
6. Cut 16" wood slats
7. Nail slats into identical top and bottom frames
8. Using self tapping screws, screw into the corners
Now just fill it with topsoil and plant your favorite crop.

The above is the finished product. The below photos show the step by step process on getting this puppy built so suit your gardening needs while providing a nice decorative touch.

I like to use a dewalt brand chop saw but you can do everything in this project with a table saw.

Cut all four 2 X 4's to a 36" length. These will serve as the top and bottom frames for securing the wood slats.

The above is a look at all four boards cut to length and ready to be ripped into, length wise.

Rip the boards lengthwise to make two equal halves.These will create the framework for this design.

Eight total 36" lengths of wood frame pieces.

Make all 8 pieces look just like this one with 45 degree cuts in both corners. Think of how a picture frame is built and this is the same concept.

I took a marker to illustrate the portion that will be cut out using the table saw.

It takes two swipes with the table saw to create the cut out ledge to facilitate the wood slat installation.
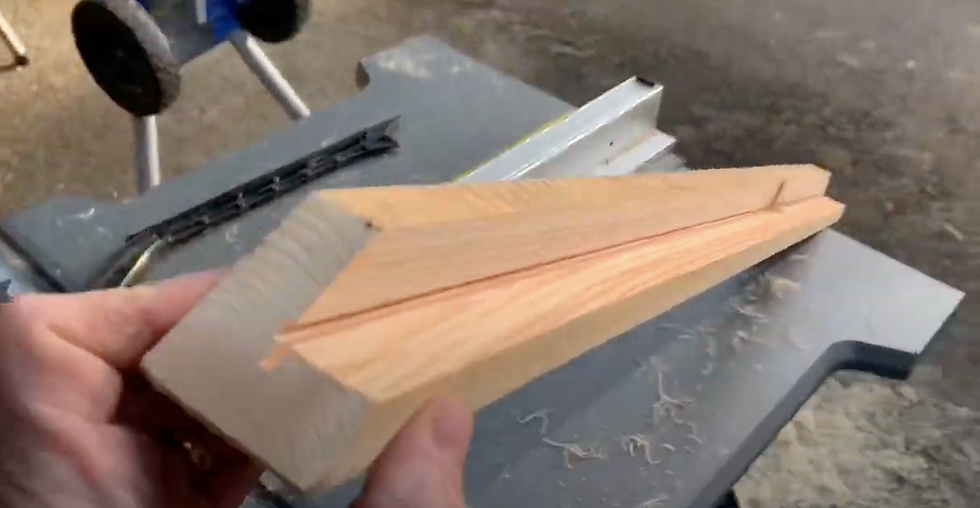
This is a cross sectional view for a closer look.

I set the boards on the ground to create the picture frame. Two identical frames need to be made.

I like to use my cordless brad nailer to keep things tacked together.

Here's the two frames that have been created and tacked together.

Now I cut a bunch of 16" length wood slats for the sides. Thickness doesn't matter a heck of a lot as you won't see this from the outside of the planter.

This is a look at the chop saw doing what it does best. I wear eye and hearing protection during the use of all power tools.

I use a wood rasp and clean up the edges a little bit by cleaning up the edge burrs.

Now it's time to start slapping in the wood slats. This is really the easy part now.

I like to move around a little bit while installing these to maintain the form and the rigidity of the structure.


Now you can coat it with a sealant if you wish. I like to use boiled linseed oil applied with a rag.
Here's one above made for free from scrap pallet wood. Pallet projects are fun too.
In this DIY Homemade Pallet Firewood Wood Storage Bin-Repurposed Pallet Wood video I demonstrate how to simply construct a useful and practical all weather log seasoning rack. Since I used so many pallet slats for other projects I had many of the big pallet cross member pieces left over. Typically I would slice them up into burnable pieces and use them for getting my fire started as they are great for this. In this case I needed racks in which to store all of my firewood so these were just what I needed. So I started sorting them out and getting 4 that were nearly identical to start out with and then of course pulling the nails out of pounding them in. In some cases I had to knock them off to the side and pound them flush. The reason to start out with 4 that are identical is so the sides will be close to equal height. For the bottom all you'll need is two that are nearly identical. The top is less important as long as you have pieces that are long enough as you can trim the top or even use slats if you have long enough ones. As far as the nails go, whenever I pulled them I tried to staighten them if needed and save them for future use. In this case I was able to reuse them for building these things. After sorting the pieces I laid them out on the ground in a "U" shape making two identical parts right next to each other. The bottom portion of the "U" gets nailed together to the side pieces. Once the two identical parts are constructed I stacked them on top of one another. I then used some pallet slats as securing pieces to hold the two modules together. After standing the pieces upright I completed the square by nailing the top portion on. This adds strength to the side pieces when storing firewood and also adds to the visual appeal. These are nice to make because they are free and also you can make as many as you want and stack them next to each other in a nice organized fashion without the fear of your firewood falling over. It also makes it easier to secure a tarp to it if you need to keep it dry.
![DIY Pallet Keepsake Box | Rustic Vintage Looking Woodworking Project Tutorial [Pallet Keepsake Box]](https://static.wixstatic.com/media/999b04_46f33e314d3f46afa5c2187592c44ee2~mv2.jpeg/v1/fill/w_980,h_735,al_c,q_85,usm_0.66_1.00_0.01,enc_avif,quality_auto/999b04_46f33e314d3f46afa5c2187592c44ee2~mv2.jpeg)


Kommentare